Shopify
Integration Document

About Shopify
Shopify Inc. is a Canadian multinational e-commerce company headquartered in Ottawa, Ontario. It is also the name of its proprietary e-commerce platform for online stores and retail point-of-sale systems. Shopify offers online retailers a suite of services "including payments, marketing, shipping, and customer engagement tools to simplify the process of running an online store for small merchants.
Shopify is a commerce platform that allows anyone to set up an online store and sell their products.
In Shopify Integration, we have:
- SKU Pull
- Order Pull
- Order Status Update i.e. delivered etc.
- Order Shipment
- Inventory Push (both single and multi-location)
- Inventory Reconciliation
- Order Push (for Endless Aisle via Vin Store)
- Order Cancellation
Prerequisites
- API URL
- API Key & API Password
- Location ID if its multi-location
Process to generate API Key & Security Key
1. Login to Shopify Admin Panel with registered email ID and password.

2. Click on “Apps.”

3. Scroll down and click on “Manage Private App.”

4. On the next page, click on “Create new Private App.”

4. Give your app a name and provide your contact email address.
5. Set the following Permissions to Read and Write (all of the first four listed in the Admin API section):
- Store content like articles, blogs, comments, pages, and redirects
- Customer details and customer groups
- Orders, transactions, and fulfillments
- Products, variants, and collections
6. Then click Review disabled Admin API permissions to also enable permissions for:
- Locations (Read access)
- Inventory (Read and Write Access)
- Fulfillment services (Read and Write Access)
- Draft orders (Read and Write Access)


All other permissions are optional and can be configured per your preferences.
Click Save to create the app, then get the API key and password from the Admin API section:

Copy the API Credentials and API URL.
Channel Configuration
In the below steps, we will provide you information on how to configure Shopify on Vin eRetail.
1. Login to Vin ERP instance and go to “Manage Channels” under the sales section.

2. Go to the top right-hand side of the window and click on “Add New.”

3. Pick the channel from the list as per the location. Four channels are listed covering 1) India, 2) Middle East Asia (MEA), 3) Malaysia, Singapore, Philippines and 4) the United States.

4. Fill in all the details like Channel Name, order Source WH, Order Sync from date, Return Sync from Date, Inventory Sync Method, Enable Inventory Reconciliation, etc. as per the Channel Maintenance window.

5. Click on Configure interface.

6. Enter the Details:
- API URL: This is the API URL of the Shopify website. If your Website is e.g. https://www. test. com then we must set the URL as e.g. https://test.myshopify.com/admin/
- API Key: API Key generated as mentioned above.
- API Password: API Secret key generated as mentioned above.
- Is Multilocation: This flag is required to be checked as “Yes”
1) to enable the multi-location inventory push and
2) to pull the SKUs and Its Product Ids as per the requirement of Multi-location Inventory Push.
This is mandatory if there are more than one location on Shopify.
- Location ID: Location ID can be fetched by two methods:
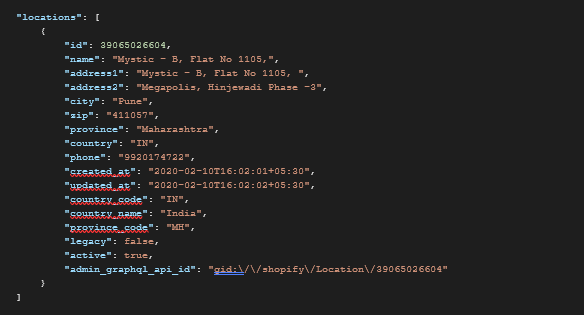
a. In Shopify admin, Go to the Settings > Location section. On the next page, you can find the location ID in the URL. It is the long string of numbers at the end as shown in the screenshot below:

b. The location ID can also be fetched by calling the “Get Locations” API i.e. https://test.myshopify.com/admin/locations.json.
In this scenario instead of API URL e.g. test.myshopify.com, you need to put the correct base API URL of the client’s website admin panel. It will ask for the username and password.

Username: API key (Process already mentioned above)
Password: Secret Key
You will get a response in the below format. Take the ID value from the response and use this in configuring the channel.
Note: Pls make sure that the store/warehouse address for which you are fetching the location id is correct.
- Pull Fulfilled Orders/New orders on Hold: This should be selected as “Yes” only if the client has submitted it as a special requirement for Orders Status, i.e., the client must fulfill the Orders with status Fulfilled instead of Un-Fulfilled (status of the new order) on Shopify.
The new orders have the status as HOLD. (Post verification by their customer care team, the orders will be marked “Un-hold” > Update the status as fulfilled> then Pulled to ERP as new orders).
Note: This flag will only be enabled by the client or they must provide information that the new orders are created as Fulfilled orders and he wants to see such orders as “Allocated” in ERP. So, use this flag wisely.
- Pull Tax from Shopify: If you select this option as “Yes”, it will enable a feature wherein we will stop referring the tax code/HSN mappings present in the system and will only refer to the tax percentage coming from Shopify.
Note: If the tax category etc. is not enabled on Shopify then the order will be created in ERP with Zero tax. So, use this flag wisely.
- Pull orders on orders name: This is a flag for the Clients to pull the orders based on Order Name. Shopify Order No is an auto-incremented series and It creates problems for the clients (Brand Distributors, 3PLs) who have more than 1+ Shopify channels because for all the channels the series remains the same.
Example: For website 1, the order no. is 1234. So, there is a 100% possibility that on the other Website also, the client will receive 1234 as Order No. So, to maintain the uniqueness, this is a must have thing.
- Store Additional Discounts: This flag is used to store the scripted discounts (more than 1 discount maintained at Cart or item level on a Product within that order or Order).
7. Click OK and Save the Channel with name. A new Channel code will appear.

Channel Maintenance
Channel Maintenance setup helps the client to reduce manual intervention and avoid the multiple usages of the website. With the selection of below options at Channel Maintenance window (Sales > Manage Channels > Add New > Shopify) in Vin eRetail instance, User can get the advantage of using multiple features of Vin eRetail:
S.No. | Feature(s) | Where to Click | Dropbox/Checkbox option | Details |
1. | SKU Pull | Channel Maintenance > Channel SKU > SKU Sync > Pull/Push |
| SKU Sync: SKU Sync between Channel and e-Retails can be done via PULL & PUSH. Users can choose to Pull the SKU’s from the channel to the eRetail panel. And User can choose Push to send the SKU data or changes from eRetail to the channel. |
2. | Order Pull/Order Pack/Invoice/Order Shipment/Shipping label generation | Channel Maintenance > Orders > Order Sync > Yes/No |
| Order Pull: The user can choose to sync the order from the channel to eRetail by managing this option. If this is disabled, the Order pull will not happen also the shipping label/Invoice and manifest will not get generated. |
3. | Inventory update | Channel Maintenance > Inventory Sync |
| Automatically pull and update the inventory |
4. | Inventory Reconciliation | Channel Maintenance > Enable Inventory Recon |
| By clicking Inventory Recon as “Yes,” it enables Vin eRetail to reconcile the inventory. (* It is only scheduled for once/day) |


Channel Mappings
Shopify does not have any provision available to fetch the product Ids from the Admin portal. So, it is mandatory to use SKU Pull and Map the SKUs accordingly.
- If the multi-location flag is not enabled, only the ID of Shopify SKU will be pulled as Product id.
- If the multi-location flag is enabled, then Id~variantId is pulled.
